Data upload
All BroodMinder sensors transmit data via Bluetooth. There are several ways to collect the recorded data - via your smartphone or via a hub.
Broominder - APIARY App

Introduced in 2018, the BroodMinder-APIARY app is our most powerful app. We strongly recommend using it as opposed to the BroodMinder-Lite app.
For all users, you can see the current state of the sensors and also upload them easily to MyBroodMinder.com. It also allows basic control of the sensors as well as firmware updates.
For MyBroodMinder-Premium users, it will read and upload every BroodMinder device in your apiary directly to MyBroodMinder with a single keypress. It can also be used to automatically send your live data to MyBroodMinder.com every 10 minutes.
Once the data is transferred, review of data and keeping hive notes can be done directly on MyBroodMinder.com. We recommend this because of its ease of use.
Please note that this app only stores your hour by hour data in the cloud and does not keep a copy on your phone and/or tablet.
New features have been added in 2019-2020
-
Many more device details displayed including hive name.
-
Remote uploading – The apiary app now works with or without internet connectivity (premium users only).
-
Hub mode – You can use any internet connected iOS or Android device to send data every 10 minutes from your apiary (premium users only).
-
CELL wakeup – The BroodMinder-CELL device can be taken out of deep sleep.
-
Change sample rate from 60 minutes to 15 minutes.
-
T2 firmware updates to SwarmMinder.
-
Power off control for T2.
Usage of the app is super simple.
-
Go to MyBroodMinder.com and create an account (this is free).
-
Download BroodMinder-Apiary from your app store.
-
Start the app and press the gear icon and enter your MyBroodMinder credentials.
-
Return to the list screen and in a few seconds it will automatically find every BroodMinder device in the area and display them on the screen.
-
After the BroodMinder IDs turn green, press the cloud icon
 in the upper right of the screen to begin upload to MyBroodMinder.
 -
Now the app will show you a upload progress screen. The top line is status while harvesting the BroodMinder data. The lower line shows the transfer to MyBroodMinder status. 6)After all of the devices have uploaded you will see a transfer complete message.
After the transfer is complete, the data will show up in MyBroodMinder. If you have already set up your devices, all you do is look. If these are new devices, you will need to find them in your MyBroodMinder "Device Inventory" and assign them to an apiary and to a hive. See the next section on MyBroodMinder.com for more on that.


Settings
-
Display in metric
-
Fast connect – This will speed up connection time by making the 'advertising rate' faster. This means the BroodMinder will send out a signal every one second instead of every 5 seconds. The downside is that it will also shorten battery life. You might want to set this fast in the summer and slow in the winter.
-
Hub mode – See below.
-
Enable remote device sync – You can retrieve data even when there is no internet connection or cell coverage in your apiary.
-
Before going to the apiary – go to the device list and press the cloud with the down arrow

This will load the list with all of your devices and the last time data was retrieved. (If you don't do this, all of the data will be retrieved from your BroodMinder. This could be a full year of data!) . -
When in the field, sync your devices like normal. They will fail upload since you don't have internet, but that is OK.
-
When your return to civilization, restart the app and it will suggest that you upload to the cloud now. Do this and MyBroodMinder.com will get updated.
-
Hub mode
Hub mode lets you use and old phone or tablet to automatically send your BroodMinder data to MyBroodMinder once every 10 minutes. This way you can see how your bees are doing 24/7 from anywhere in the world.
Just enable hub mode and return to the list screen.

BroodMinder - LITE App

NOTE: We now recommend using the BroodMinder Apiary app. It is more reliable and will work for most people.
Device compatibility
Apple – iOS
The BroodMinder app will work with any Apples device that has Bluetooth Low Energy (BLE) available. It will work with iPhone model 4s or newer and with iPads 3rd generation or newer.
Android
Android is a bit more complicated. Android introduced BLE support in Version 4.3 (Jelly Bean, July 2012). Devices before that will not work. Devices after that may work. Most new devices (2015 or newer) do work. However, there are many flavors of phone and we have found a few that give us problems. If your device does not work, then contact us at support@broodminder.com.
A new feature has been added to the app in version 2.97 to increase the "advertising rate" of your BroodMinder devices. As shipped, the BroodMinder sends a message out once every five seconds that contains temperature and weight information. The General Settings page now has a Bluetooth Config button which allows you to change the advertising rate to once per second. This will speed device connection and will make data retrieval faster. It will however reduce battery life to 3-6 months.
We have also added a "Reset Android Bluetooth" under the Bluetooth Config button. This will do a system reset of the Bluetooth function. We have found that on some phones this will help re-establish communication.
There is more information at MyBroodMinder.com/resources.
Installation
The BroodMinder app is available at the Apple App store, or the Android Play Store, or the Amazon Play Store, depending on your device. If you search for "BroodMinder", (it is called BroodMinder Lite on Android) you will find it. Install it just like you would any other app.
After it is installed, start the app. The app should present you with a warm and congratulatory welcome message. You can choose to watch our Queen Bee, Laura Davis demonstrate installation, or you can dismiss the message and let the app do its thing.
The app will start scanning for BroodMinder devices in the area and will automatically fill the screen with any that it finds within the area.
If none show up:
-
Make sure that the battery tab has been removed from the BroodMinder-TH and make sure that the battery is pressed into place on the BroodMinder-W.
-
Make sure that your phone/tablet has Bluetooth turned on.
-
Make sure that you are within 10-20 feet of the BroodMinder device.
Home Screen of BroodMinder App
BroodMinder-T will display Temperature BroodMinder-TH will display Temperature & Humidity BroodMinder-W will display Temperature & Weight

Details/Graph Screen of BroodMinder App

General Setting Page

Device Setting Page

Real Time Mode
If you would like to see "Live" data, you can use the "Real Time" button on the Graph screen. Pressing this button will change the sampling rate to 5 seconds and then show a display of values in the lower section of the screen.
B: Battery level
T: Temperature (currently only F)
H: Relative Humidity in %
L/R: Balance between left and right sensors. Adds to 100% (-W scale only)
W: Total weight (currently only pounds) (-W scale only)
Delta: Change in weight from when Real-time started. (-W scale only)
This data will also be saved in the log file.
Pressing the "Real Time" button again will leave this mode and set the sampling rate back to 60 minutes.
Setting the Broodminder-W scale factor

By default, the BroodMinder-W scale factor is set to 2.0. This means that any weight the BroodMinder-W sees is doubled to reflect the full weight of the hive. From looking at the physics of the situation (see appendix below) we know that this is an approximation and not totally accurate. In most cases, it is close enough since small changes will still be seen and a 5-10% error in total weight is not important.
A more accurate total weight display can be obtained by adjusting the scale factor to account for the hive specific situation.
Go to the Graph Screen of the scale and press the real time button. In a few seconds, the app will begin to display the scale reading once every 5 seconds at the very bottom of the screen. You can also see the % load on each load cell.
Now add a known weight of 10-20 pounds to the top center of the hive. You should see this weight change in the app readout. Then you can adjust the scale factor to exactly match the weight change.
Example:
| Weight | Delta Weight | Scale Factor | Notes |
|---|---|---|---|
| 121.2 | 0.0 | 2.0 | Start of Real Time |
| 132.2 | 11.0 | 2.0 | We added the weight |
Now we go change the scale factor | Weight | Delta Weight | Scale Factor | Notes | | --- | --- | --- | --- | | 129.5 | 10.0 | 1.82 | Now the calibration is closer | | 117.0 | 0 | 1.82 | After the weight is removed, we see the new more accurate hive weight |
Setting the BroodMinder-W temperature compensation
The sensors used in the BroodMinder-W are very high quality and exhibit little temperature effect. However, there is still variation from scale to scale and therefore we have provided a means to improve the accuracy through the adjustment of the scale temperature compensation – "Scale TempCo".
To adjust the TempCo, you should pick a portion of your weight graph in which you know there is little weight change due to bee activity. A cloudy day is a good time because we know that they are not foraging. There should also be a good outdoor temperature change of at least 20 degrees F in less than a day.
As you make small changes to the TempCo value, you will see the weight graph settle out to a uniform weight as one would expect.
If you see weight spikes even after adjusting, then possibly it is due to the scale being in the sun. The sun can heat of the scale quite quickly and dramatically. This makes it very difficult for the TempCo to be effective.
Device diagnostics

Tagging Graphs


Pressing the Hive Notes button lets you add text to any point in time on the graph. This is useful to explain abrupt changes in the data or whenever you do a hive inspection.
This button will bring up a sub-menu with eight groups of possible occurrences or actions. Select the one most appropriate for your situation and choose the corresponding tag. Use “Custom” if the list does not cover your situation. The selections in the app will be updated as time goes on to best reflect the tags most used.
The time shown in the top half of the screen is the current time if the graphs have not been moved by pinching or swiping before the “Tag Graph” button has been pressed. It can be adjusted by clicking on it.
When noting a past event, it is useful to move the chart and line up the time of the event with the “Note Time Indicator” and then press Hive Notes. In this case, the note time in the notes window is the time at the “Notes Time Indicator” and not the current time.
Of particular interest is the "Inspection" button. This button will walk you through a 6 easy to answer questions about the state of the hive. The list was shared with us by Dick Rogers and we think it is a quick and effective way to document the hive.
BroodMinder Hub

BroodMinder-WIFI/CELL is an optional component which sits in your apiary and relays data from your BroodMinders directly to mybroodminder.com via a WIFI or CELL connection. We have designed the BroodMinder-WIFI/CELL to automatically begin working when power is turned on.
For best results, watch the installation video at BroodMinder.com/pages/videos

Quick Start Instructions
-
IMPORTANT: Sync all devices & post to mybroodminder.com before starting your BroodMinder-WIFI/CELL
-
Place the BroodMinder-WIFI/CELL in the apiary with the solar panel towards the sun
-
Get the BroodMinder-CELL app (even if it is a WIFI/CELL unit)
-
Start the app, your BroodMinder-WIFI/CELL should show up on the list.
-
Press exit deep sleep
-
WIFI/CELL only – Enter your WIFI/CELL network name and password (matching capitalization is important)
-
DONE! - Data should start showing up in mybroodminder.com in about an hour.
Installation
You can install your BroodMinder-WIFI/CELL in many different configurations depending on circumstances. The bracket on the back of the electronics enclosure may be flipped as shown in some of the examples.

Here are a few installation considerations
- The solar panel will fully charge the battery with about 4 hours of good, direct sunlight.
- The battery should last 3-4 days with no good sunlight
- Wireless reception is hampered by trees. Mounting on a tree may be problematic if your signal is marginal.
- In extreme cases we can suggest a more sensitive antenna (Cellular only). Contact us at support@broodminder.com.
- Tie wraps or pipe clamps may be used to secure the system
- A small 3' post like available at major hardware stores works well. They have tabs that can be slightly bent to allow the BroodMinder-WIFI/CELL to be inserted. Then, a tie wrap at the bottom secures the unit.
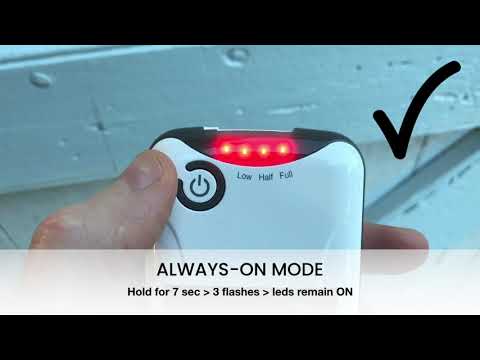
Solar Battery Always-On Mode
We ship BroodMinder-WIFI/CELL with the battery in Always-On mode. Under normal conditions, you will not need to open the electronics enclosure.
The solar battery is a Voltaic V15 and features two power modes.
- In Always-on mode, the V15 power never turns off
- In Auto-off mode, the V15 power automatically turns off after about 20 minutes
It is important to have the V15 in Always-on mode so that the BroodMinder-WIFI/CELL continues to work 24 hour per day.
Let us repeat: We ship BroodMinder-WIFI/CELL with the battery in Always-On mode. If you never hold the V15 (solar) power button for more than 5 seconds, you do not need to change anything.
If you do hold the V15 power button for \> 6 seconds, it will change the mode. It alternates from Alwayson to Auto-off and back and it is a little tricky to figure out which mode it is in.
To tell the difference, watch the V15 lights AFTER the 3 flashes described below.
- Block the solar panel to make the lights less confusing
- Press and hold the power button
- After 6 seconds, the LEDs on the V15 will flash 3 times
- If the light stays on for a few more seconds, it is in Always-on mode. This is good!
- Release the power button
If after the 3 flashes, the V15 lights turn off, it is in Auto-off mode. This is not good. Try again and it should be correct this time.
Indicator Lights
BroodMinder CELL App
The BroodMinder Cell App allows you to closely watch how things are going. Some of the things that you can monitor include:
- Deep Sleep Mode – see below.
- Current status of BroodMinder-WIFI/CELL (Initializing, time until next data transfer, connecting to WIFI, sending data)
- Number of BroodMinders found in the apiary
- WIFIlular signal strength
- Lots of diagnostic features
We won't go into a lot of detail in the manual because there is not much to adjust with the app. In fact, the only things that you can adjust is when and how often data is transferred to Mybroodminder.com. The rest of the app is to aid our support personnel in diagnosing problems.
When you receive your BroodMinder-WIFI/CELL, it should be in Deep Sleep mode in order to conserve the battery during shipment. You will need the BroodMinder-CELL app to wake it up.
By default, the BroodMinder-WIFI/CELL will transfer data hourly.
App Home Screen

Note: if you left swipe on the screen you can delete unused BroodMinder-WIFI/CELL devices.
App Configure Screen

App Diagnostics Screen

- Firmware Version – This shows the version of firmware in the BroodMinder. (e.g. 0.17)
- Sent Samples – The number of samples sent to Mybroodminder.com
- Missed Samples – The number of missed samples as indicated by missing sequence numbers.
- WIFI/CELL Network – WIFI/CELL diagnostics, see next page.
- Modem Communication – Watch the communications to the Wifi/Cell modem.
- Reboot Device – This will restart the BroodMinderWIFI/CELL and purge it of all stored data.
- Debug Values – These are Amanda's secret debug values.
- Enter Deep Sleep – When we ship the device, we put the -WIFI/CELL in deep sleep to suspend all WIFIular connection and thus save battery life so that when it show us, it is ready to go.
App Readings Screen

- Send Now – Immediately connect the modem and send this data to MyBroodminder.com
- Copy – Copy this screen. You can paste into e-mail
App Cell Network Screen

NOTE: These are commands to the CELL modem. See the next page for Wifi commands. If the modem is not on, invoking a command will turn it on. Give it a few seconds and then try the command again. The result will be printed at the bottom of the screen.
-
Network Signal Strength – for reliable operation, it should be 4, (maybe 5) or more.
-
Check Network Time – Time from the WIFI/CELL network.
-
Connected Network Provider – Typically ATT but may be others.
-
List Network Providers – See all the providers in the area.
-
Get SIM ID – This should match the number stickered inside the enclosure.
App WIFI Network Screen

- SSID – Make sure that capitalization matches your network name.
- Password – Password for your network.
- Security – Typically WPA-Personal but may be none or WEP.
- List Networks - Lists all available networks.
Device compatibility
Apple – iOS
The BroodMinder app will work with any Apples device that has Bluetooth Low Energy (BLE) available. It will work with iPhone model 4s or newer and with iPads 3rd generation or newer.
Android
Android is a bit more complicated. Android introduced BLE support in Version 4.3 (Jelly Bean, July 2012). Devices before that will not work. Devices after that may work. Most new devices (2015 or newer) do work. However, there are many flavors of phone and we have found a few that give us problems. If your device does not work, then contact us at support@broodminder.com.
A new feature has been added to the app in version 2.97 to increase the "advertising rate" of your BroodMinder devices. As shipped, the BroodMinder sends a message out once every five seconds that contains temperature and weight information. The General Settings page now has a Bluetooth Config button which allows you to change the advertising rate to once per second. This will speed device connection and will make data retrieval faster. It will however reduce battery life to 3-6 months.
We have also added a "Reset Android Bluetooth" under the Bluetooth Config button. This will do a system reset of the Bluetooth function. We have found that on some phones this will help re-establish communication.
There is more information at MyBroodMinder.com/resources.