W3 and DIY Circuit Board Calibration
This guide explains how to calibrate your BroodMinder-W3 hive scale or a custom scale built using the BroodMinder-DIY circuit board.
Calibration ensures that the scale accurately converts the signals from its load cells into weight measurements.
The procedure is performed using the BroodMinder Bees App.
Before You Start
Before starting the calibration, make sure that:
- Your scale is fully assembled and connected to the Bees App.
- The scale is resting on a stable, level surface.
- You have a rigid plywood plate large enough to cover the scale and distribute the weight across its load cells.
- You have a known calibration weight available.
Preparing the Calibration Setup
Place the plywood plate on top of the scale, making sure it rests properly on the scale's support points.
The plate allows all load cells to contribute to each measurement, while the calibration weight is moved between different positions.
Keep the plywood plate in place throughout the entire calibration procedure.
1. Open the Calibration Screen
In the BroodMinder Bees App, navigate to:
Devices > [Your Scale] > ⋮ > Show Details > ⋮ > Troubleshooting > Calibrate Scale
The calibration screen should look similar to this:
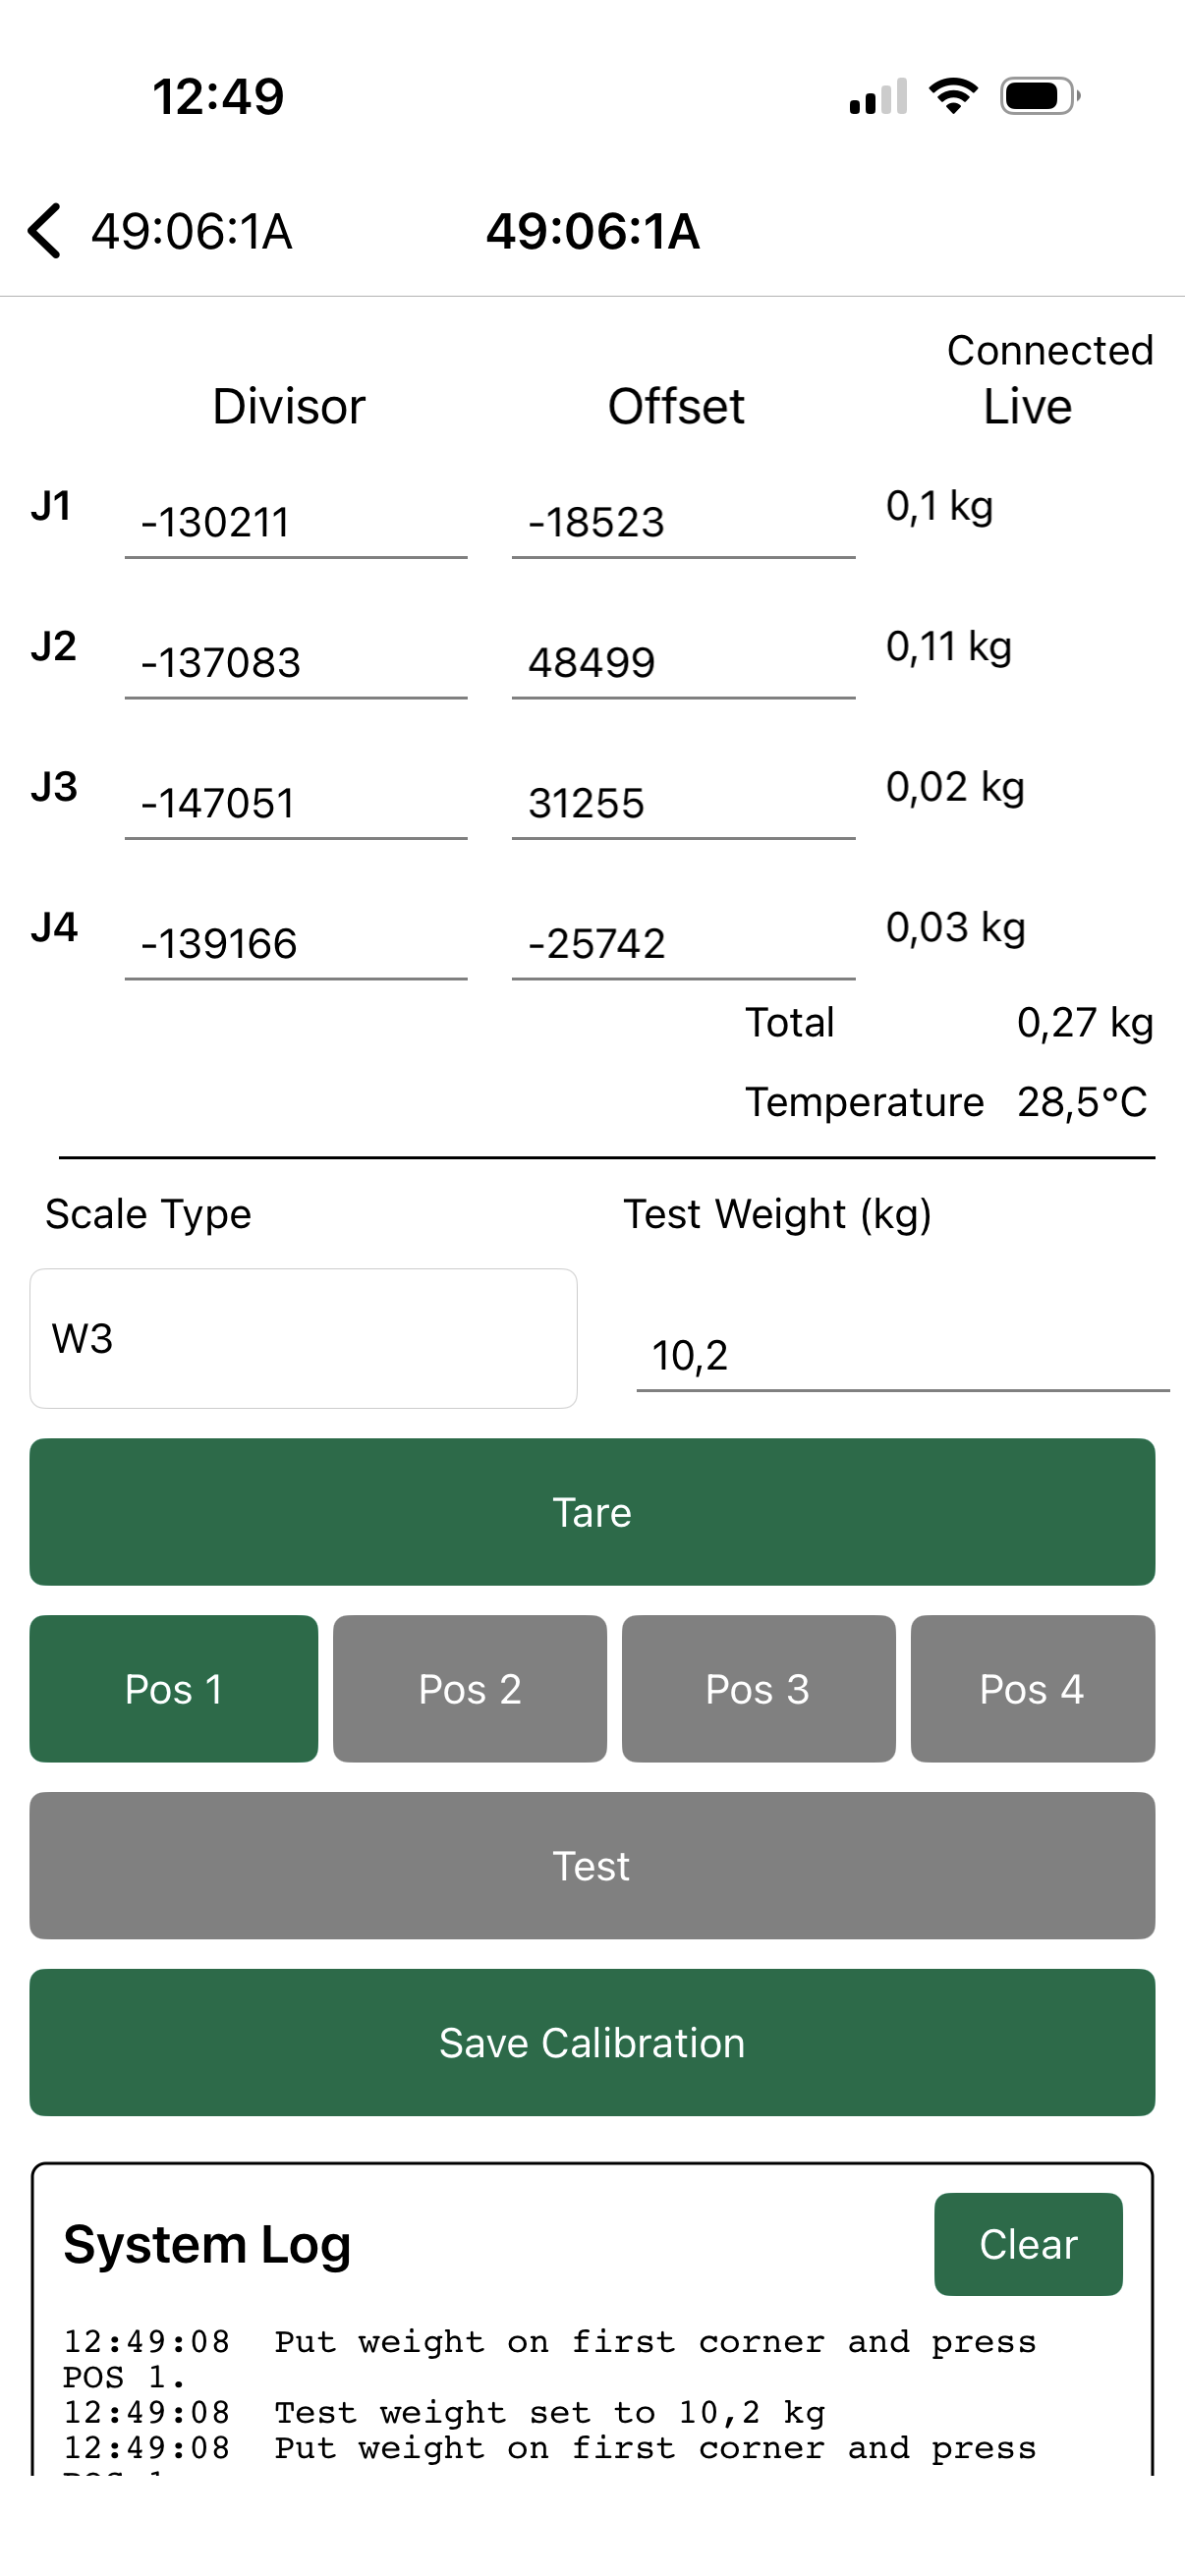
2. Calibrate Your Scale
Follow these steps in order.
Step 1 — Select Your Scale Model
Select the appropriate scale model from the list.
This determines the calibration procedure and the number of calibration positions available.
Step 2 — Enter the Calibration Weight
Enter the known weight you will use for calibration.
This is the weight you will move between the different positions on the plywood plate.
Step 3 — Tare the Scale
With the plywood plate in place and no additional weight on it, press Tare.
This sets the scale's zero reference and automatically calculates the load cell offsets.
Keep the Plywood Plate in Place
The plywood plate must remain on the scale during the entire calibration process.
Press Tare with the plate installed but without the calibration weight.
Do not remove or reposition the plate after taring.
Step 4 — Calibrate Each Position
You will now take measurements with the calibration weight placed at different positions on the plywood plate.
For a W3 scale with four load cells, these positions correspond to the four corners of the plate.
- Place the calibration weight on the first corner of the plywood plate.
- Press
Pos 1. - Wait for the app to complete the measurement.
- When
Pos 2turns green, move the same weight to the second corner. - Press
Pos 2. - Continue moving the weight between the remaining corners, following the sequence indicated by the app.
- Repeat until all required positions have been measured.
All Load Cells Work Together
Each measurement includes contributions from all the load cells, not just the one closest to the calibration weight.
Moving the weight between corners changes how the load is distributed across the sensors.
The Bees App uses these different measurements to calculate the individual calibration coefficients.
Follow the Green Buttons
The Bees App guides you through the calibration sequence.
Wait for the next position button to turn green before moving the weight and continuing.
Different Scale Configurations
The number of calibration positions depends on your scale model.
For example, a BroodMinder-W5 has only one load cell, so only Pos 1 will be available.
For multi-load-cell scales, follow all the positions requested by the app.
Step 5 — Test the Calibration
Once all positions have been calibrated, the Test button will turn green.
- Press
Test. - Place different known weights on the plywood plate.
- Move the weights to different positions, including the center and corners.
- Observe the live weight reading displayed in the app.
- Check that the measured weight matches the actual weight, regardless of its position.
Verify Weight Independence
A properly calibrated scale should report approximately the same total weight regardless of where the calibration weight is placed on the plate.
If the reading changes significantly between corners, repeat the calibration procedure.
Step 6 — Save the Calibration
Once you are satisfied with the results:
- Press
Save Cal. - Wait for the app to finish saving the calibration.
Calibration Complete
Your scale is now calibrated and ready to use!
The calibration values have been saved to the device.
3. Understanding the Calibration Screen
The following image illustrates the different calibration controls and their functions.

| Control | Function |
|---|---|
| Scale Model | Selects the scale configuration |
| Calibration Weight | Defines the known weight used during calibration |
| Tare | Sets the zero reference and calculates offsets |
| Pos 1, Pos 2, ... | Records measurements with the weight placed at different positions |
| Test | Enables live weight readings to verify the calibration |
| Save Cal | Saves the calibration values to the device |
How Does Calibration Work?
On a scale with four load cells, all four sensors contribute to every weight measurement.
When a weight is placed on one corner of the plywood plate, the nearby load cell generally carries a larger portion of the load, but the other sensors also contribute.
Moving the same weight between the four corners produces different load distributions.
The calibration algorithm uses these measurements to build a system of simultaneous linear equations.
For a four-load-cell scale, there are four unknown calibration coefficients (slopes), one for each sensor.
By solving these equations, the Bees App determines the coefficients needed to calculate the correct total weight, regardless of where the load is positioned.
The sensor offsets are calculated automatically during the Tare step.
You do not need to calculate or manually adjust these values. The Bees App handles the entire process automatically.