BroodMinder TH & T
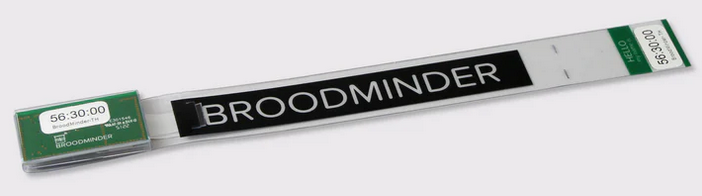
Broodminder TH (56)
This sensor measures in-hive temperature and humidity and will also watch for temperature events such as swarms. Based on those informations we will be computing Brood level, hive fitness and a set of specific alerts (hotter and colder limits, excessive humidity...).
The first BroodMinder-TH was released in 2016. It was model 42 and was evolved into TH2 back in 2019. The SwarmMinder (see below) version TH2SM was introduced in May of 2020 evolving to model 56. In 2023 it was evolved to TH3 which is the current version distributed.


Installation
All Broodminder-TH device IDs start with 56 so they should be easy to recognize. The normal placement of the sensor is on top of the frame near the middle of the hive box of interest. This position is chosen for several reasons:
-
Heat rises, therefore the sensor will feel the heat of the brood below.
-
The brood tends towards the middle of the hive and then surrounds the brood with pollen and honey. Placing the temperature sensor here has the best chance of sensing the brood.
-
Using this standardized position allows for cross-hive comparisons across the world.
If you are in a cold climate and you overwinter in more than two boxes, then you may want to move the sensors up to under the inner cover. This is because as the cluster moves above a sensor, that sensor tends to sense the outside temperature (since heat rises).
By placing the Broodminder-TH sensor right below the inner cover, you will sense the heat of the entire hive. Condensation is very likely when it reaches 100% and you may want to inspect the hive and take appropriate action if necessary.
Note: Relative humidity (RH) depends both on moisture in the air and temperature. As temperature goes down, RH goes up. A good example is when RH = 100% outside dew forms. The same thing will happen in your hive.
If you move the Broodminder-TH to the top, then you may want to move the other Broodminder-TH to right below the top box. That way you will see as the cluster moves up past this box.
As a final note, the Broodminder-TH is thin enough that if you want to experiment with different positions such as between the frames you can. We would love to know how this works for you and what you learn.
Whatever position you choose, you can add a tag to the data using the Broodminder app. We'll talk about doing that in a later chapter.
Note
Do not forget to adjust the actual date/time you installed the device in hive. It is necessary to start with clean data from the onset, otherwise (if you powered on a few days before) the brood estimation will start with the data from your livingroom!
SwarmMinder
SwarmMinder is a special feature of BroodMinder TH and T. The device is scaning for sudden thermal variations. It enters a decision loop that depending on how in-hive conditions evolve, might end-up trigering a Themperature Event.
See below the details of this feature.
Maintenance
The CR2032 battery is replaceable by opening the wrapper. It should last more than a year and we recommend replacement each fall before the low temperatures of winter.
If your plastic wrapper gets used by time, you can order new ones and replace them during your winter service.
Broodminder-T (47)
The BroodMinder-T (Temperature) is a cost reduced version of the BroodMinder-TH. It will sense the hive temperature which will indicate brood rearing during the season and winter survival during the winter. We will be computing Brood level, hive fitness and a set of specific alerts (hotter and colder limits..)
BroodMinder-T was introduced in 2019 as model 41 and evolved to the SwarmMinder version BroodMinder-T2SM in May of 2020 becoming model 47.
Installation
All BroodMinder-T device IDs start with 47 so they should be easy to recognize. However, they exist in 2 versions :
- Broodminder-T2 with a button (until febr. 2023),
- Broodminder-T3 without button (from febr. 2023 ahead ).
For the version with no button, just remove the "remove before use" tag and it will run automatically.
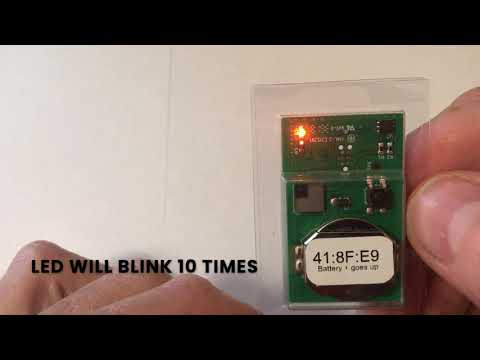
The button version (T2) is a little more complicated. to turn on the BroodMinder-T2, press the button for 10 seconds. The LED will flash 10 times to indicate success.
Warning
IF YOU DON’T HOLD THE BUTTON LONG ENOUGH, YOUR T2 WILL SHUT DOWN AFTER ABOUT 10 SECONDS.
If you ever want to know if the -T2 is operating, press the button again, and the LED will flash momentarily to indicate the battery is fine and the device is operating.
The normal placement of the sensor is on top of the frame near the middle of the hive box of interest. See the TH section above for the full explanation.
Note
Do not forget to adjust the actual date/time you installed the device in hive. It is necessary to start with clean data from the onset, otherwise (if you powered on a few days before, the brood estimation will start with the data from your livingroom!)
SwarmMinder
Broodminder-T model 47 also operates with SwarmMinder. Find all the details in the paragraph below.
Maintenance
BroodMinder-T2 : To change the battery, simply cut the tape on three sides around the circuit board. Then swing the board out and replace the battery with a new CR2032. Be sure to seal the circuit board again using packing tape.
If you want to turn off the T2, you simply have to push long on the button and it will power off. You can double check by pushing again short : the led should not flash.
SwarmMinder Details
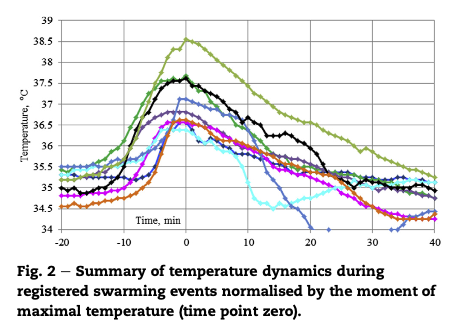
Swarm Thermoregulation
It is well known that during a swarm event there is a lack of thermoregulation from the colony and that this is reflected by a temperature overshoot like the ones displayed in the following picture:
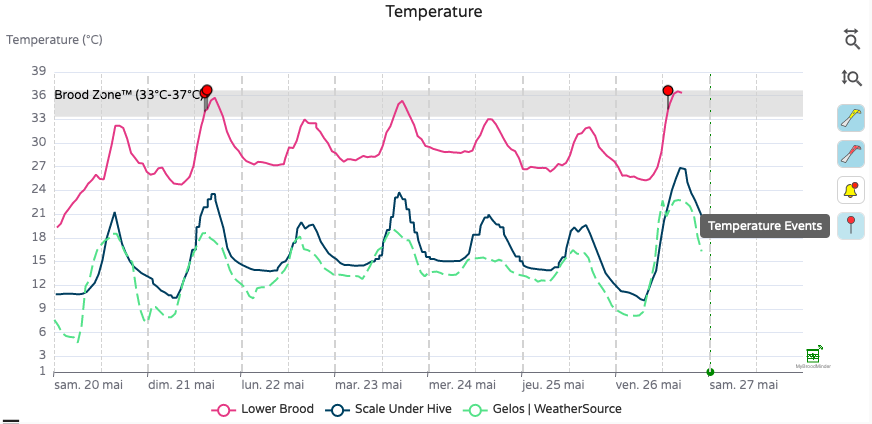
And here is an actual swarm trace:
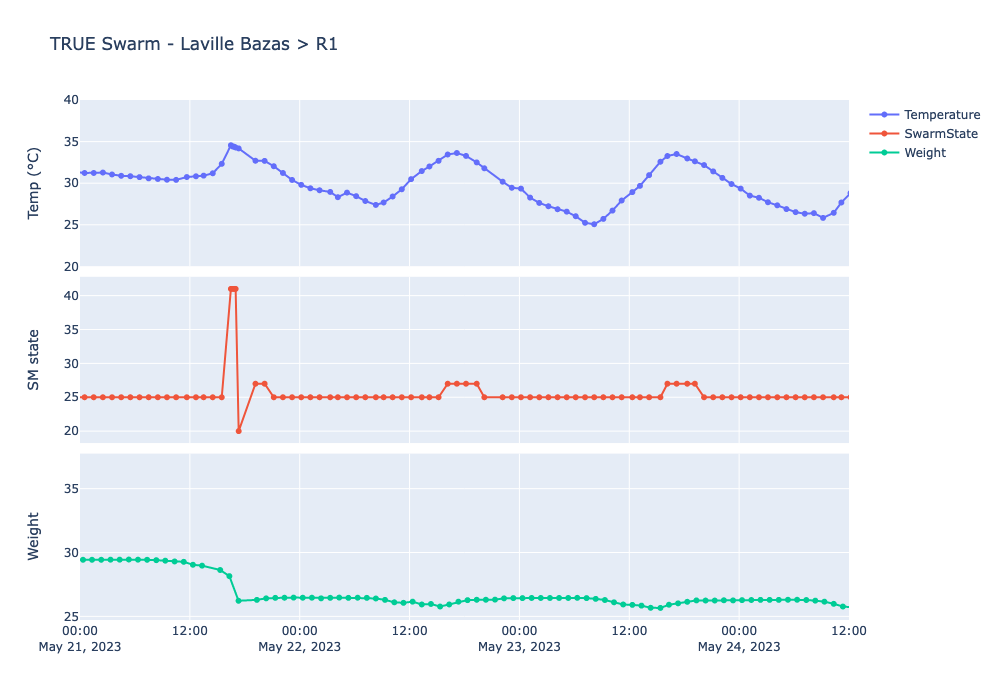
We can note the temperature peak in the afternoon of May 21st. This peak is detected by SwarmMinder and the SM state code jumps from 25 to 42. At the same time the weight drops down due to bees leaving the hive.
SwarmMinder algorithm
To capture those events, every SM device (T or TH) is reading temperature once per minute. Then it compares current and prior values looking for specific changes. It watches for a minimum temperature change to be obtained. Once achieved, it watches for a temperature increase of at least 1°C from 30 minutes prior. That increase must continue for between 2 and 20 minutes and be followed by a temperature decrease.
Any time the sensor sees a 2°C (4°F) increase in temperature (when brood is present) then the sensor records the 30 minutes before and 40 minutes after with 1 minute resolution and sets a flag indicating a Temperature Event has occurred. See the data interpretation section for more information.
Note
SwarmMinder delivers Temperature Events and not Swarm events because so far the events trigering might be from different sources, and not only swarms.
Other SM triggers might be:
- a pre-swarm some days before
- a beekeeper inspection (exposing the internal sensor to teh sun)
- a very steep ambient temperature variation and/or a low insulated hive
SwarmMinder events display
SwarmMinder events are displayed at 3 different levels:
- At hive level you will only be notified of Temperature Events (ie. SM triggered). Those events are materialized by red needdles displayed on the temperature curve. And you can choose wether you want to see them or not clicking on the corresponding icon available on the right side menu bar.
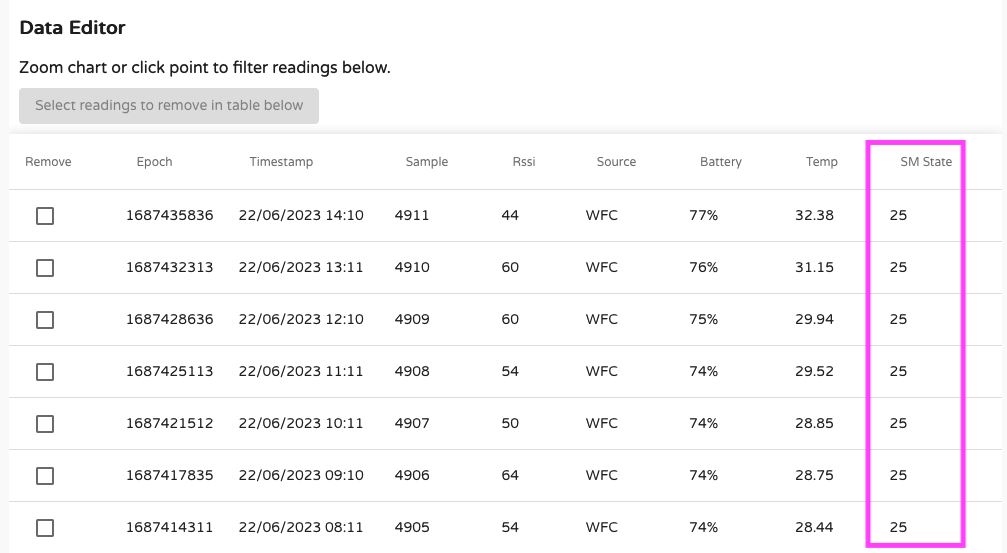
- At the device level you have the hole series of SM codes displayed on the graph. It is called
SM State
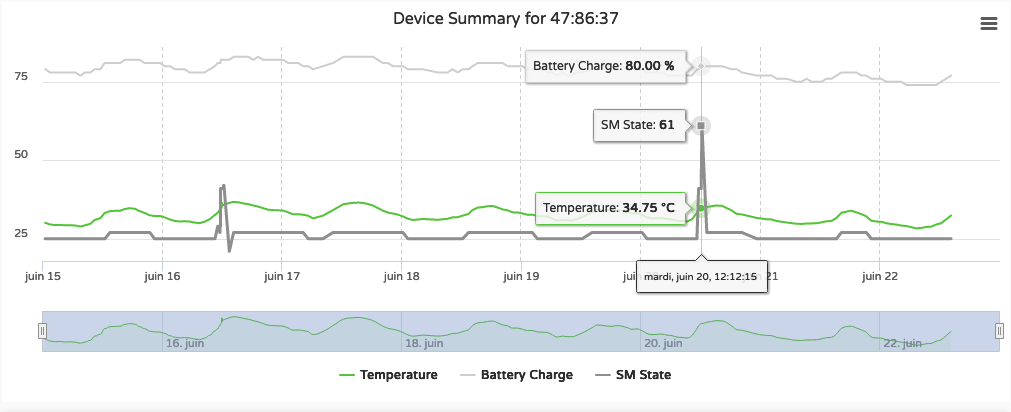
- This same data is displayed on the respective table and of course can be exported to csv, just in case you would like to play a bit more with it.
Sampling the event
As described above, the sensor is scanning every minute and if the event is detected it will keep record of the temperatures associated with it.
For those having a hub in the apiary, the trigger will be automatically detected by the hub and sent through email or SMS to the beekeeper. However the hub is not harvesting the minute information. it only takes a few points of the trace. When you do a sync with the Bees App the whole timeseries is collected and sent to the cloud.
The chart below clearly shows what are the samples sent through the hub (red dots) and the full series collected by BeesApp (green dots).

Note
There might be some slight time shift between the samples collected by the hub and those from Bees App. This is due to the fact that the timestamp set by the Hub and the BeesApp can be different.
SwarmMinder State Codes (Models 47, 56)
The following numeric codes (base 10) will be displayed in the SM State value.
SWM_STATE_STOPPED
00 SM Stopped
01 Initialization complete - stopped
02 Stopped: by STOP request
SWM_STATE_CHECKING
20 Start checking for swarm event
21 Buffering temperature data
22 Temperature < Hive Base Temp (32.5C, 90.5F)
25 Buffered Hive Temp < Hive Base Temp
29 SWARM EVENT DETECTED
SWM_STATE_LOGGING
40 Swarm Event Detected - start logging
41 Still logging swarm data
SWM_STATE_WAITING
60 Swarm Event logging complete- start waiting - swarm detection
61 Swarm Event logging complete- still waiting
Info
The temperature event trigger will only operate if the device position is assigned to the upper or lower brood box. Since the algorithm is really only meant for brood areas, this prevent spurious triggers when the SwarmMinder devices are located elsewhere.
Note
It is important to note that not all Temperature Events are swarms. In some cases it can be the consequence of other actions like for example
1/ your own inspection or
2/ a very thin and uninsulated roof that does not protect the hive from overheating at the sun => you should think on insulating..
3/ the colony preparing for swarming the days before it actually does.
We are still learning on all the different circumstances and patterns that might happen. If you want to contribute to build this knowledge and share your experience with us, feel free to drop us an email to support.